|
[worked right to left ][first strand in top layer] |
|
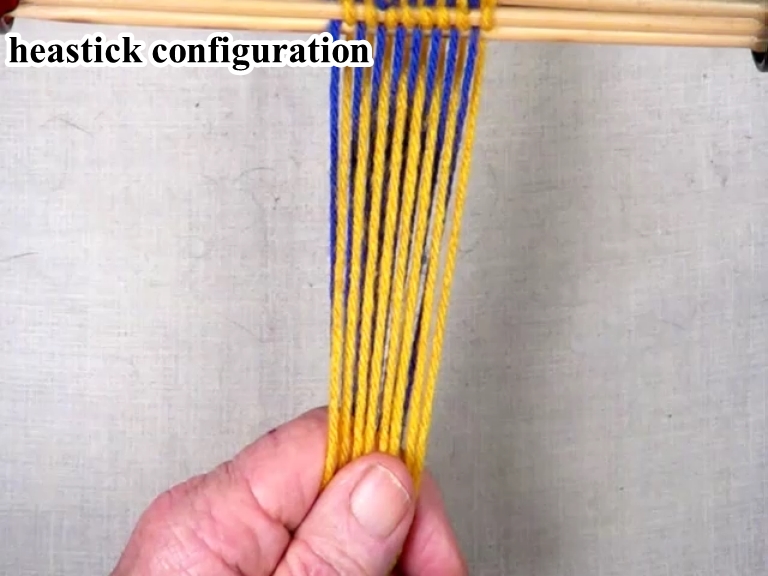
Headstick Set Up This part of the [S] twist interlinked fingerweaving tutorial will be worked from the right hand side of the workpiece to the left hand side of the workpiece. The shed is picked up on the index finger of the left hand. The bottom layer of the shed is under the index finger. The top layer of the shed is over the index finger. [NOTE] The headstick is set up so that the first strand on the right hand side of the workpiece is in the top layer of the shed. |
[figure-1]
|
| Go to: Top of page | Next |
|
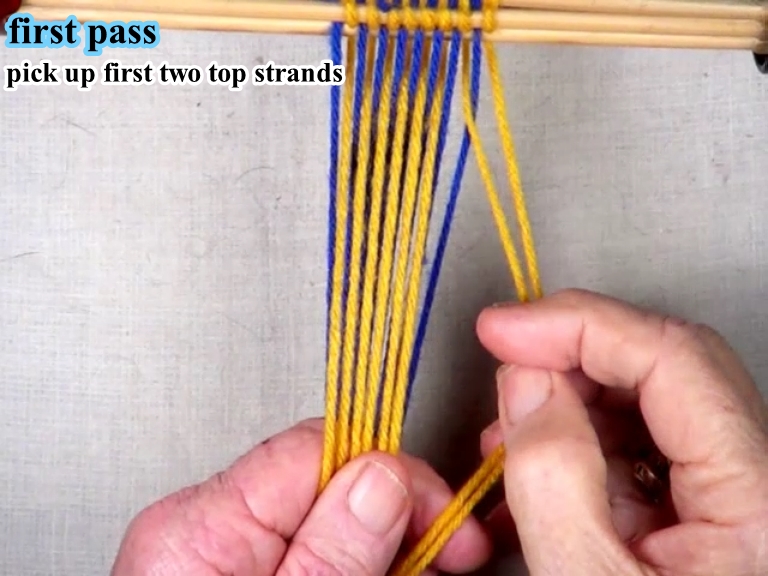
First Pass
Use the index and second fingers of the right hand to pick up the first two strands of top layer of the shed. [NOTE] This action moves the first two top layer strands to the bottom shed layer. [OBSERVE] The next two strands are in the bottom shed layer. [OBSERVE]the first bottom layer strand is between the two transfered strands. |
[figure-2]
[click here to see video]
|
| Previous | Next |
|
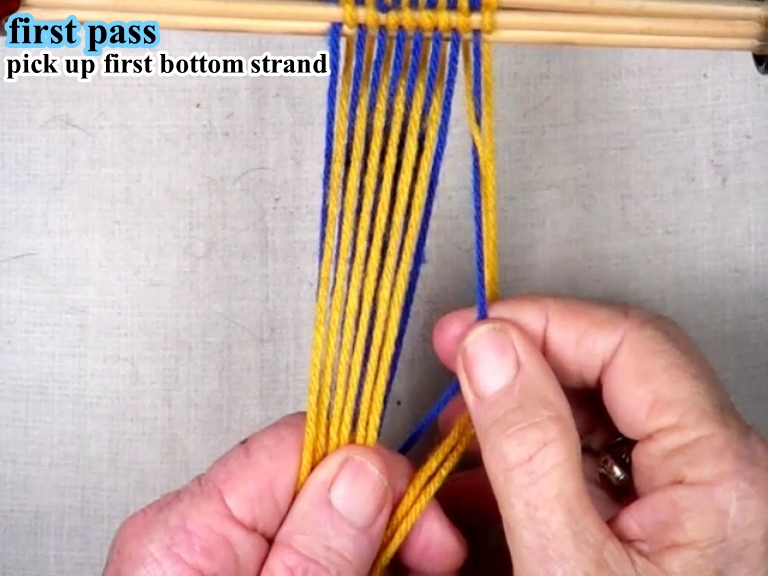
First Pass
Use the thumb and index finger of the right hand to pick up the first bottom strand. |
[figure-3]
[click here to see video]
|
| Previous | Next |
|
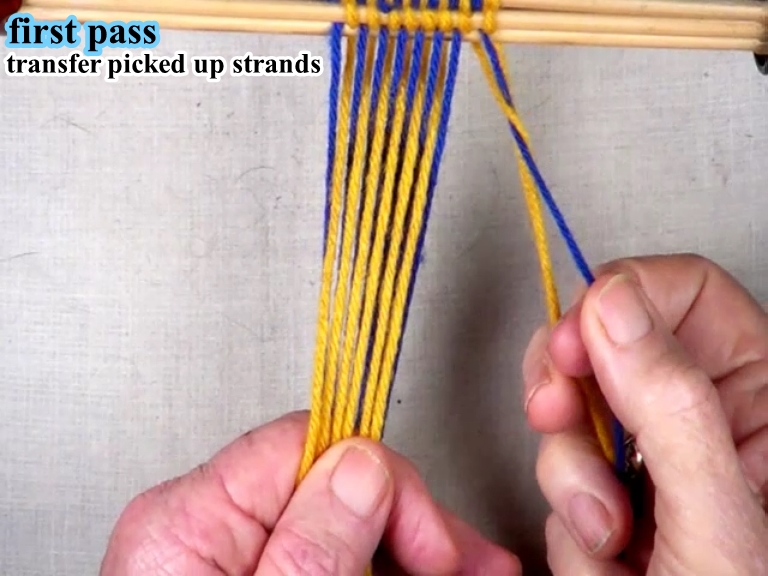
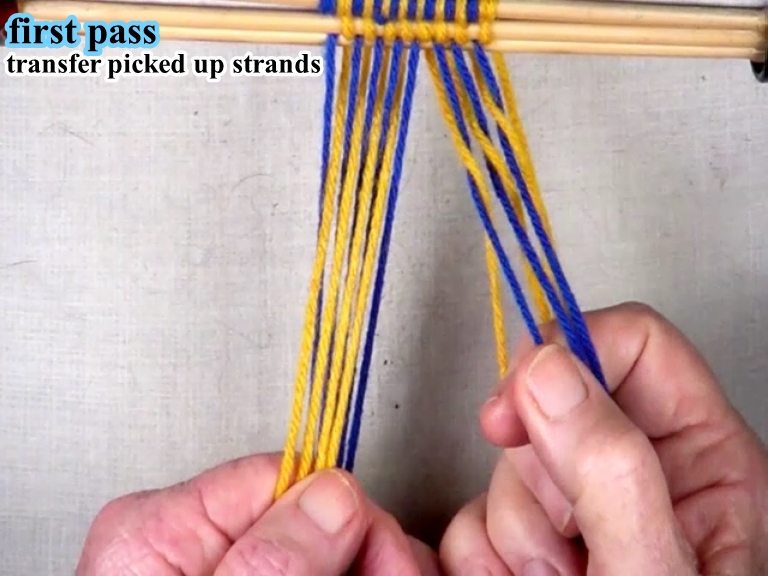
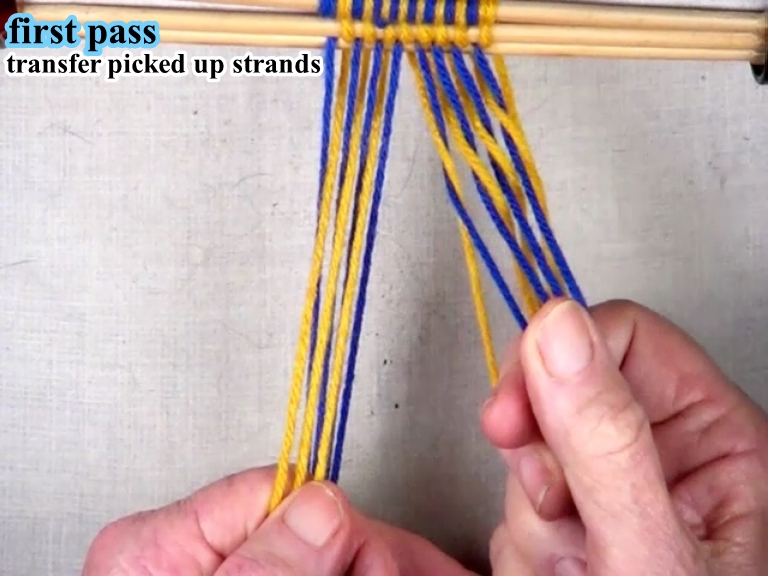
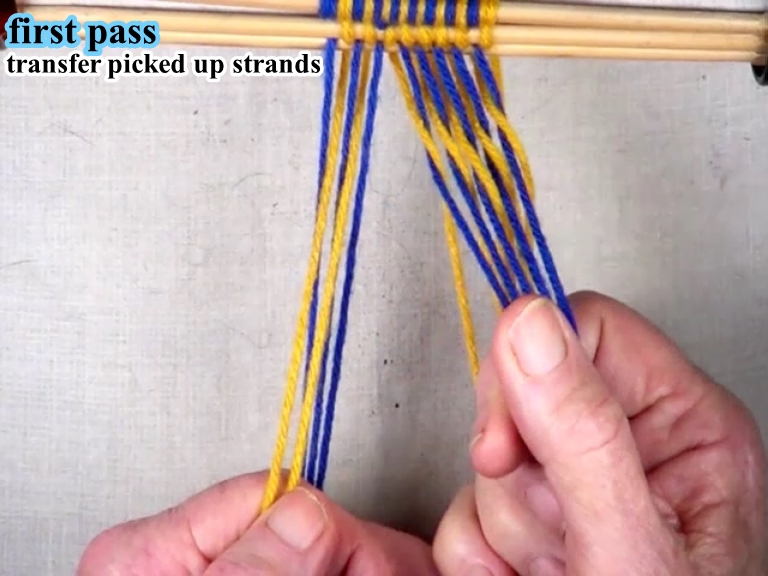
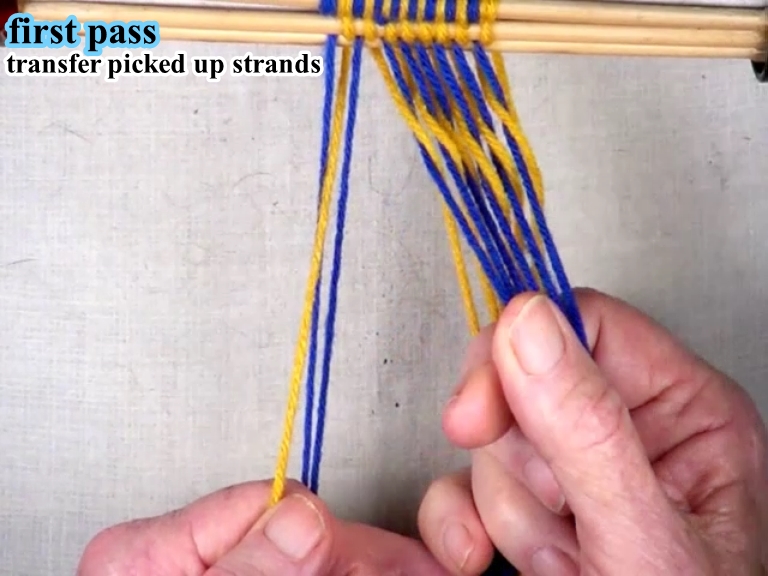
First Pass
Transfer the picked up strands to the index finger of the right hand. [OBSERVE] The shed of the picked up strands has been reversed. [OBSERVE] The next strand is in the bottom shed layer. |
[figure-4]
[click here to see video]
|
| Previous | Next |
|
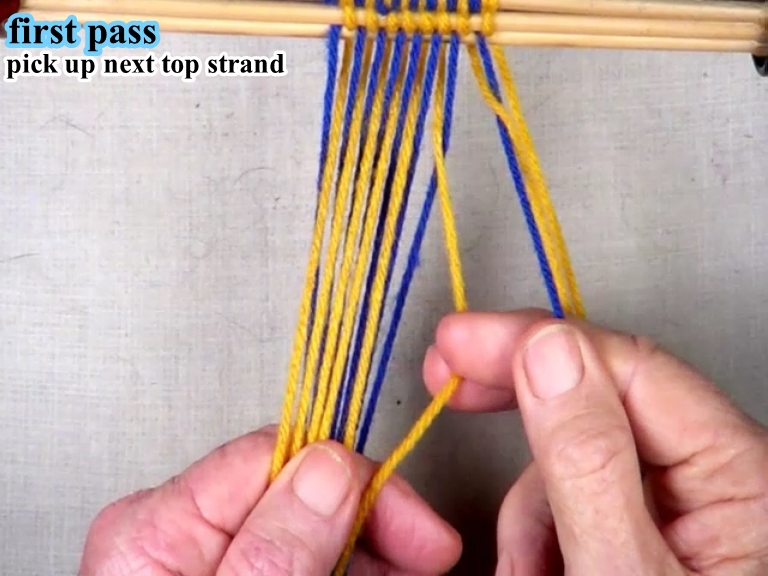
First Pass
Use the index and second fingers of the right hand to pick up the next strand of the top shed layer. |
[figure-5]
[click here to see video]
|
| Previous | Next |
|
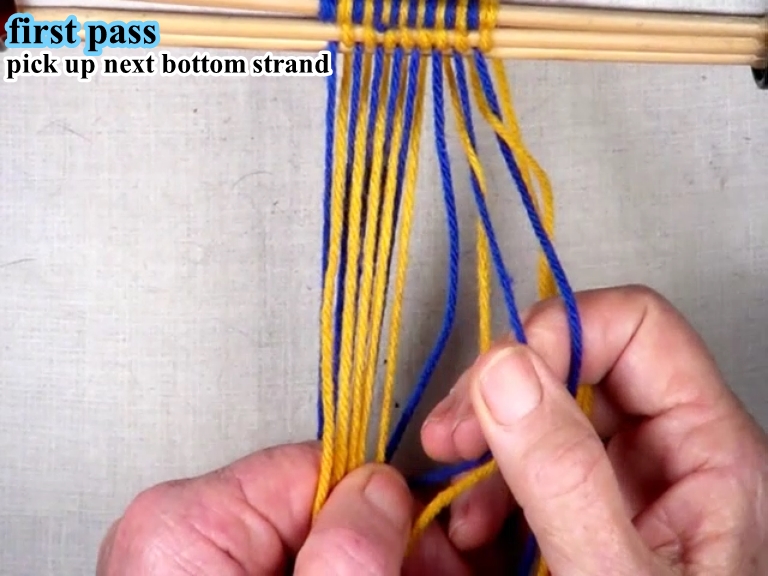
First Pass
Use the thumb and index finger of the right hand to pick up the next bottom layer strand. |
[figure-6]
[click here to see video]
|
| Previous | Next |
|
First Pass
Transfer the picked up strands to the index finger of the right hand. [OBSERVE] The shed of the picked up strands has been reversed. [OBSERVE] The next strand is in the bottom shed layer. |
[figure-7]
[click here to see video]
|
| Previous | Next |
|
First Pass
Follow the steps presented by figures 5, 6, and 7 to transfer the next pair of strands to the right hand index finger. |
[figure-8]
[click here to see video]
|
| Previous | Next |
|
First Pass
Transfer the next pair of strands to the right hand index finger. Follow the steps presented by figures 5, 6, and 7 to transfer the next pair of strands to the right hand index finger. |
[figure-9]
[click here to see video]
|
| Previous | Next |
|
First Pass
Transfer the next pair of strands to the right hand index finger. Follow the steps presented by figures 5, 6, and 7 to transfer the next pair of strands to the right hand index finger. |
[figure-10]
[click here to see video]
|
| Previous | Next |
|
First Pass
Transfer the next pair of strands to the right hand index finger. Follow the steps presented by figures 5, 6, and 7 to transfer the next pair of strands to the right hand index finger. |
[figure-11]
[click here to see video]
|
| Previous | Next |
|
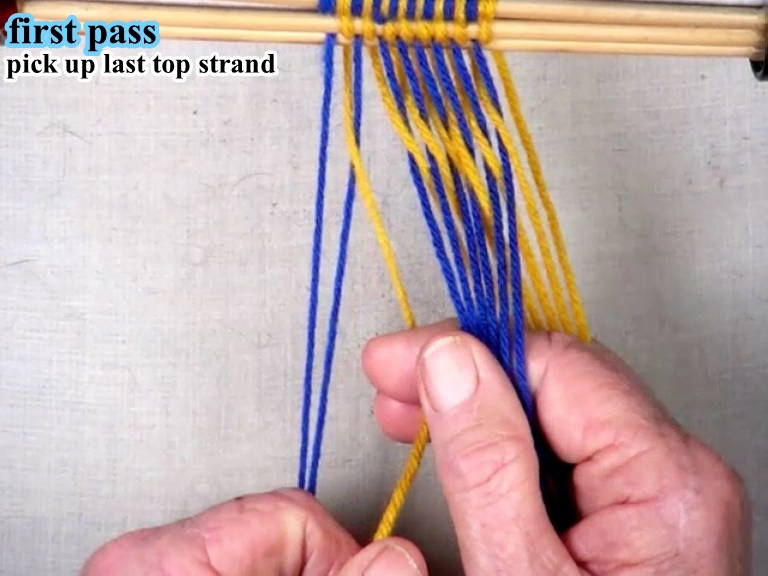
First Pass
Use the index and second finger of the right hand to pick up the last top layer strand. |
[figure-12]
[click here to see video]
|
| Previous | Next |
|
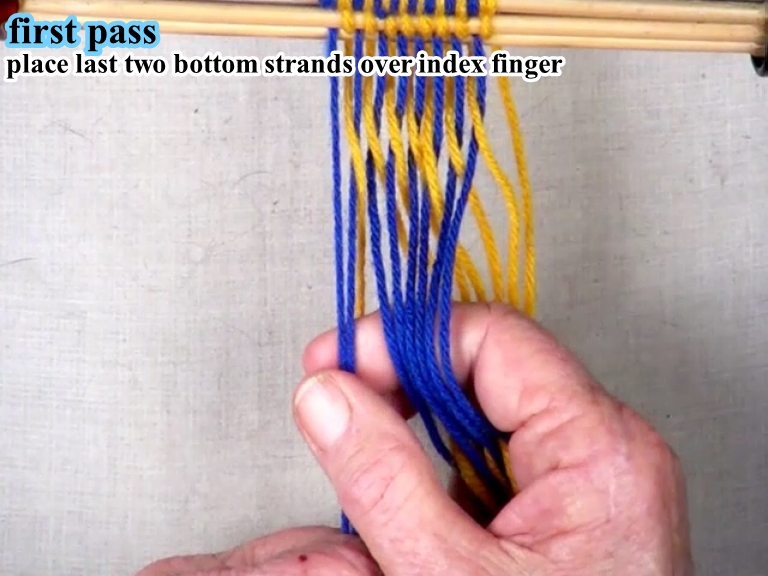
First Pass
Place the last two bottom shed layer strands over the right hand index finger. [OBSERVE] The shed has been reversed. |
[figure-13 ]
[click here to see video]
|
| Previous | Next |
|
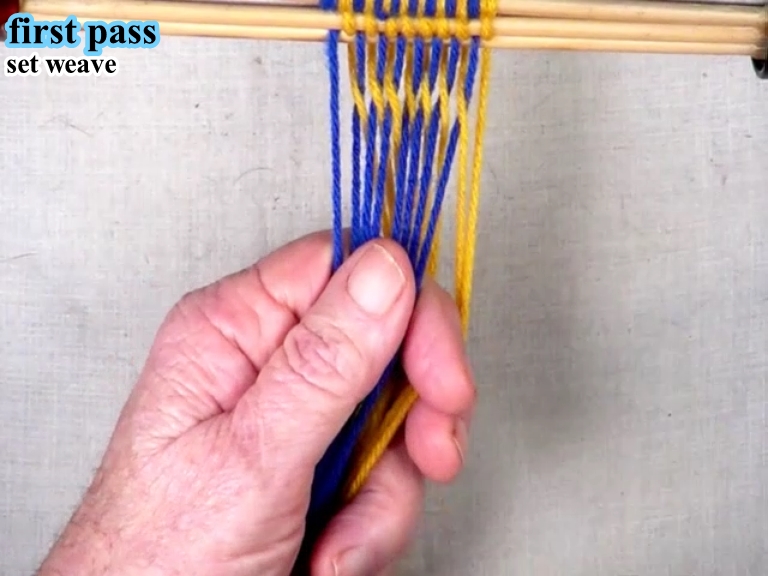
First Pass
Set the weave of the first pass by pullig the layers of the shed in opposite directions. Use the index finger as a beater to help set the weave. [OBSERVE] The first two strands on the left hand side are in the top shed layer ( over the index finger of the right hand). [OBSERVE] The first two strands on the right hand side of the work piece are in the bottom layer of the shed (under the index finger of the right hand). |
[figure-14]
[click here to see video]
|
| Previous | Next |
|
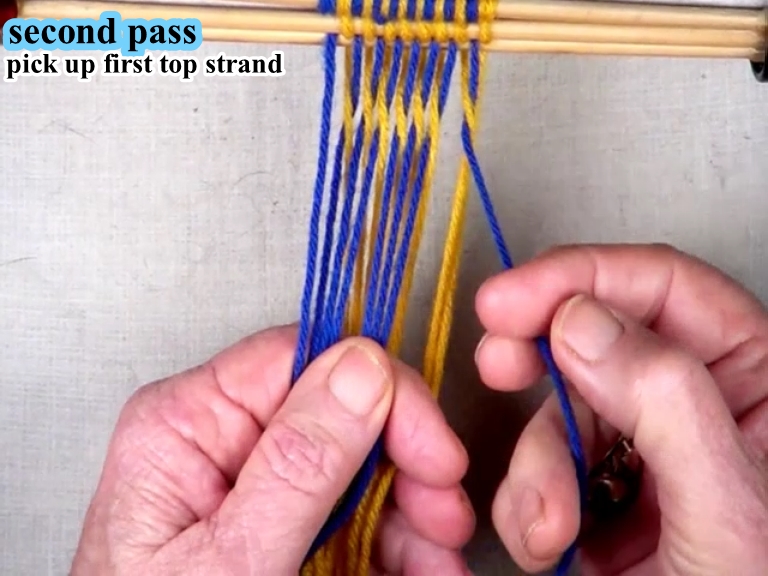
Second Pass
Use the index and second fingers of the right hand to pick up the first top layer shed strand. |
[figure-15]
[click here to see video]
|
| Previous | Next |
|
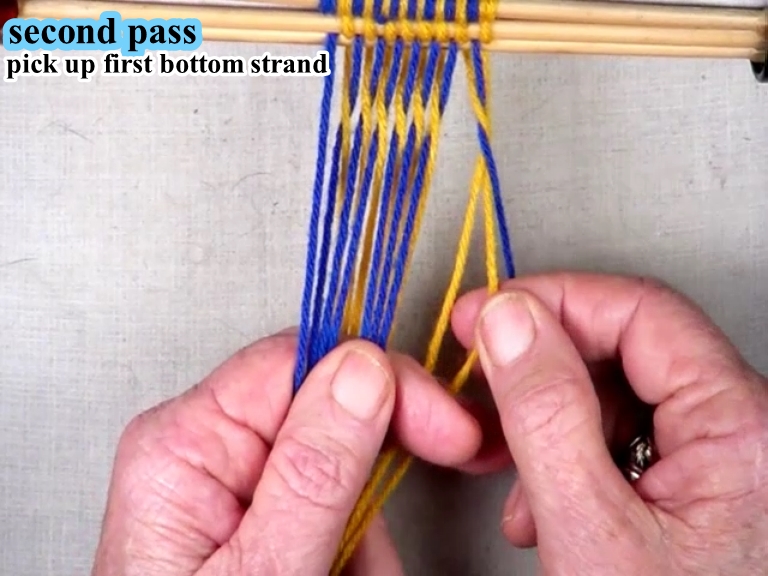
Second Pass
Use the thumb and index finger of the right hand to pick up the first bottom layer shed strand. |
[figure-16]
[click here to see video]
|
| Previous | Next |
|
Second Pass
Transfer the picked up strands to the index finger of the right hand. [OBSERVE] The next two strands are in the bottom layer of the shed. |
[figure-17]
[click here to see video]
|
| Previous | Next |
|
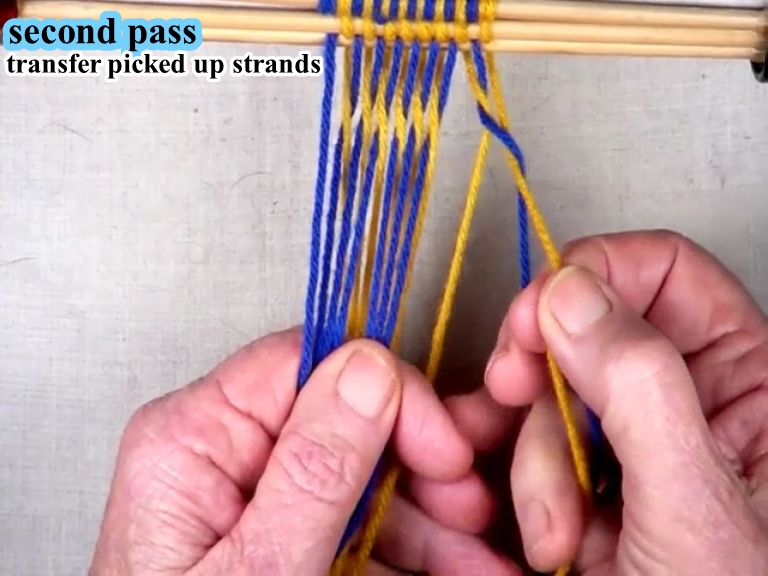
Second Pass
Follow the steps presented by figures 15, 16, and 17 to transfer the next pair of strands to the right hand index finger. |
[figure-18]
[click here to see video]
|
| Previous | Next |
|
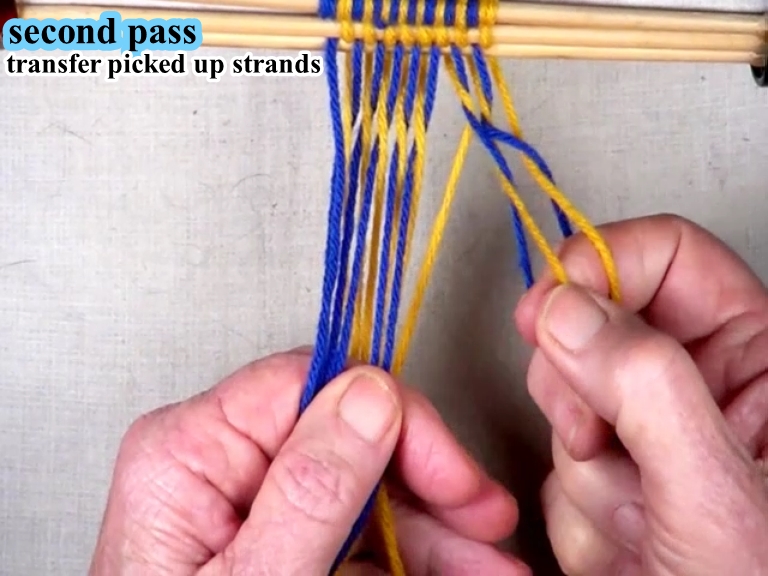
Second Pass
Transfer the next pair of strands to the right hand index finger. Follow the steps presented by figures 15, 16, and 17 to transfer the next pair of strands to the right hand index finger. |
[figure-19]
[click here to see video]
|
| Previous | Next |
|
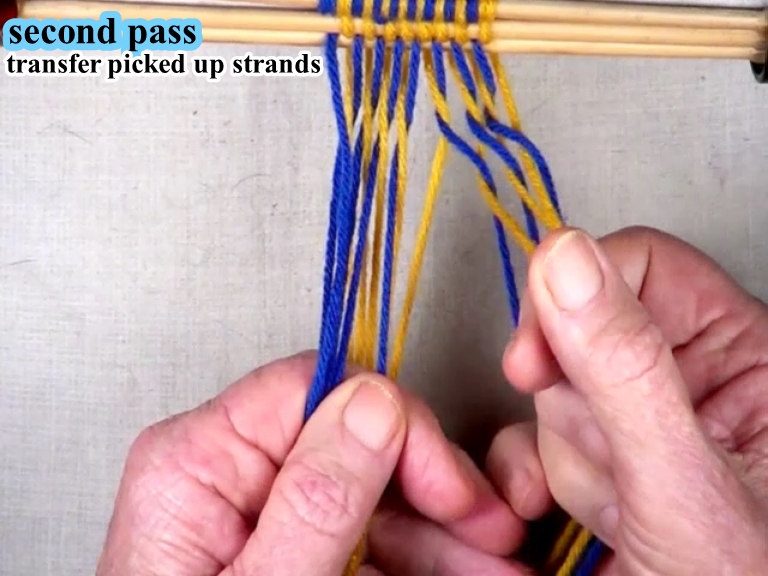
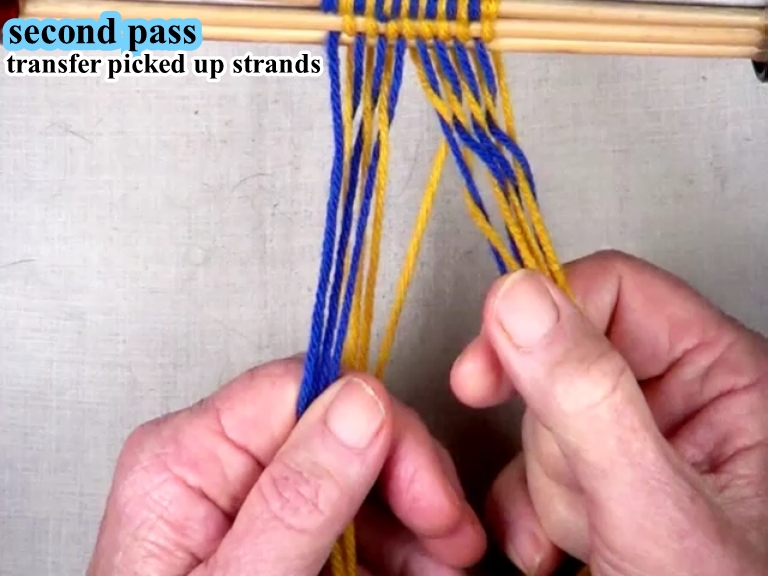
Second Pass
Transfer the next pair of strands to the right hand index finger. Follow the steps presented by figures 15, 16, and 17 to transfer the next pair of strands to the right hand index finger. |
[figure-20]
[click here to see video]
|
| Previous | Next |
|
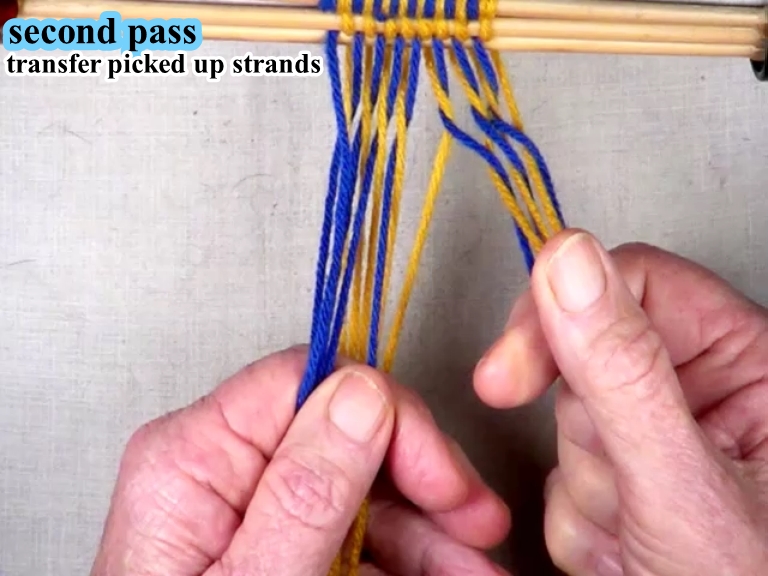
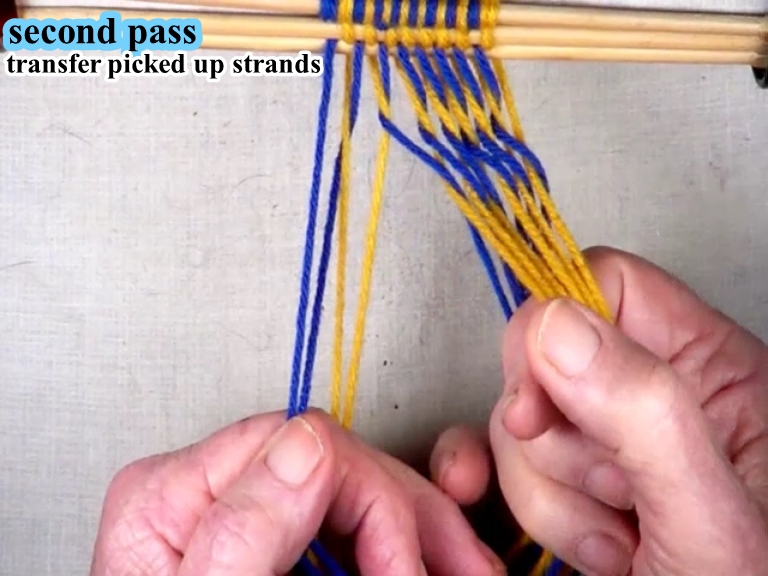
Second Pass
Transfer the next pair of strands to the right hand index finger. Follow the steps presented by figures 15, 16, and 17 to transfer the next pair of strands to the right hand index finger. |
[figure-21]
[click here to see video]
|
| Previous | Next |
|
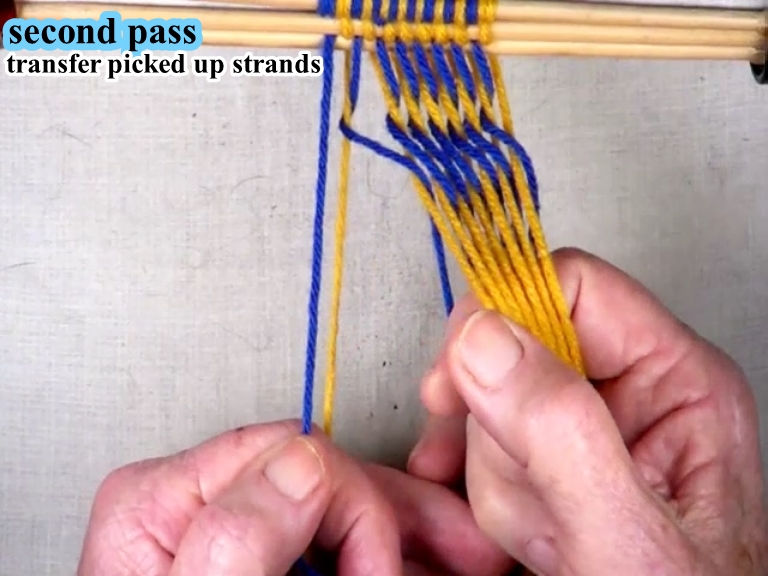
Second Pass
Transfer the next pair of strands to the right hand index finger. Follow the steps presented by figures 15, 16, and 17 to transfer the next pair of strands to the right hand index finger. |
[figure-22]
[click here to see video]
|
| Previous | Next |
|
Second Pass
Transfer the next pair of strands to the right hand index finger. Follow the steps presented by figures 15, 16, and 17 to transfer the next pair of strands to the right hand index finger. |
[figure-23]
[click here to see video]
|
| Previous | Next |
|
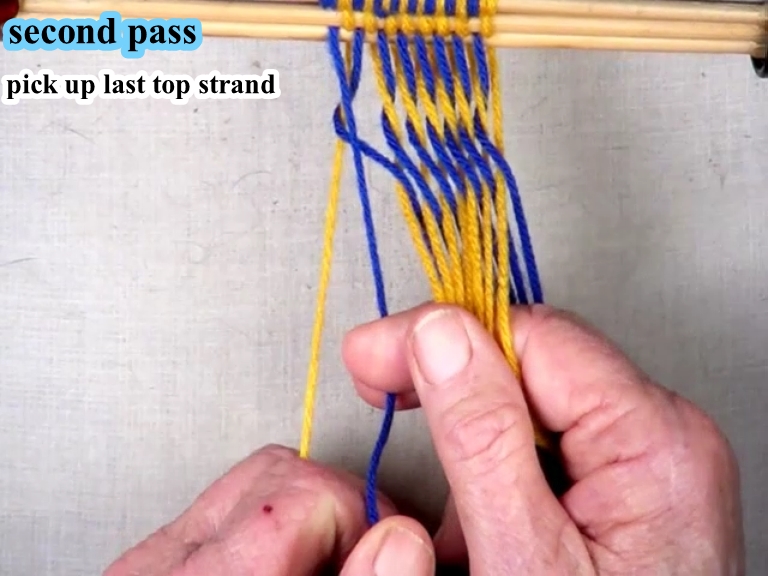
Second pass
Use the index and second fingers of the right hand to pick up the last top layer shed strand. |
[figure-24]
[click here to see video]
|
| Previous | Next |
|
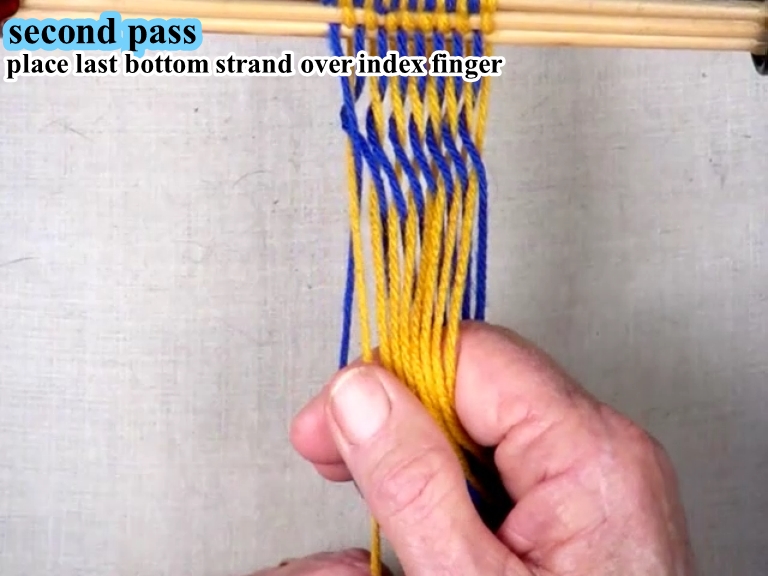
Second pass
Place the last bottom layer strand over the index finger of the right hand. |
[figure-25]
[click here to see video]
|
| Previous | Next |
|
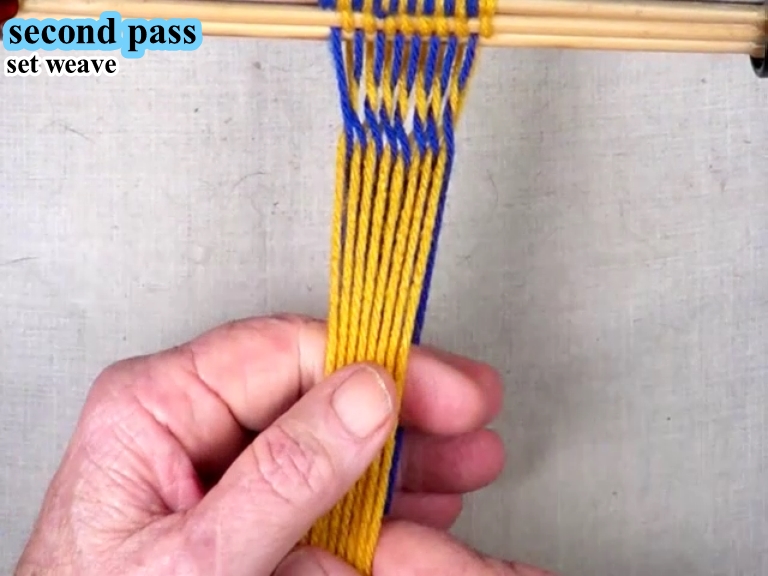
second pass
Set the weave by pulling the layers of the shed in opposite directions. Check the individual strand to make sure that they are snug and even. [OBSERVE] The over-2/under-2 configuration of the strands produced by the second pass of the weave. |
[figure-26]
[click here to see video]
|
| Previous | Next |
|
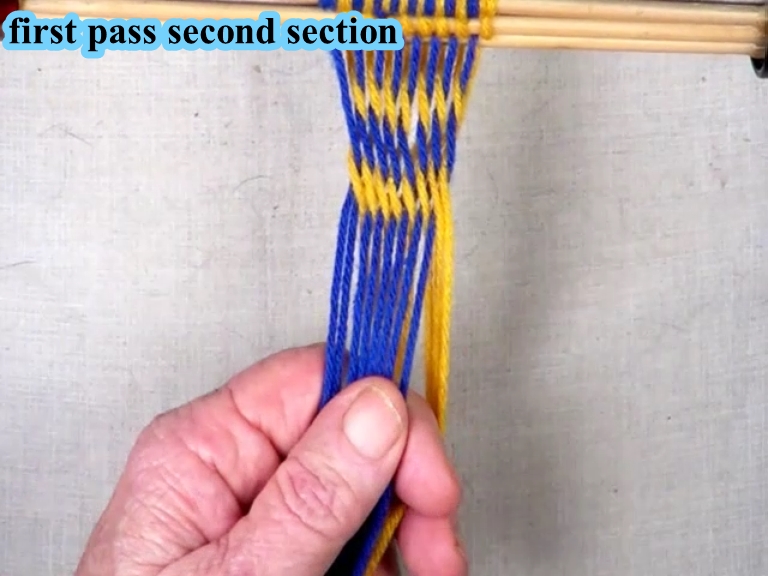
First Pass Second Section
Following the directions for the first pass,(S-twist-RL-top.html) weave the first pass of the next section. Click here for step by step directions. |
[figure-27]
[click here to see video]
|
| Previous | Next |
|
Second Pass Second Section
Following the directions for the second pass,(S-twist-RL-top.html) weave the first pass of the next section. Click here for step by step directions. |
[figure-28]
[click here to see video]

|
| Previous | Top of page |